
Expansion and upgrades are becoming more and more popular as knowledge about the internal workings of the TI graphing calculators continues to grow. Years ago I accelerated my own TI-85 (original instructions by Boris Lutz and Keith L. Miller). The TI-86 can be accelerated to approximately 2-3x their normal speed, about 18 MHz.
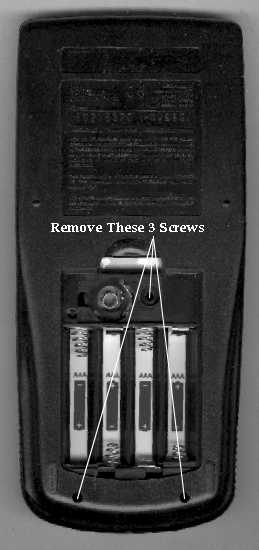
Step one is to open the calculator. To do this, take out the two screws at the bottom of the calculator. Then remove the battery cover and the batterys. Remove the screw that holds the back up batery and remove it. To pop the case, I have read that you can pop the bottom side open with a flat screw driver and run the battery cover along the side to pop it open the rest of the way. I usualy work the grooves out of the slots by pushing sideways on the case.
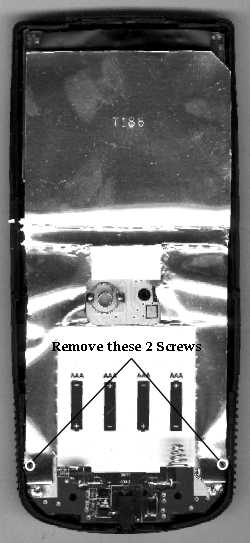
You can use the method you prefer, but once it is open you will see a silver shield. Take out the two screws at the bottom that hold the shield on and then remove the shield. Follow by removing the two screws that hold the display board on (be careful not to tear the plasic conductor strip. If you do, you can cut off the damaged piece, scrape off the stuff from over the contacts, and solder wires between the display board and the main board). Once the display is out of the way, you will see the top of the main board.
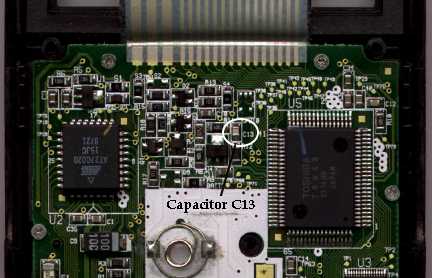
On the main board, between the Microprocessor and the chip to the left, you will find two capacitors and a resistor. On the TI-86, the capacitor is labled C13. The capcitor is a 22pf capacitor. It, in combination with a nearby resistor regulate the clock speed to about 6 MHz. If you replace it with a 1pf capacitor, the clock will cycle about 2.5-3 times its normal speed! Simply removing C13 will almost always work to accelerate the calculator by 3 times. If you simply remove C13 and you occasionaly get lines across your screen that don't go away until you reset, then you will have to use the 1pf capacitor or return the 22pf capacitor. I personaly don't recomend adding the 1pf capacitor when using my instructions. The wires add a little capacitance and make up for it. You should only need a 1 pf capacitor if you are not using a switch to select speeds, and after you test the calculator without the 1 pf capacitor to see if it runs properly.
You can add a switch to switch between normal speed and accelerated speed. I recomend this method over the permanent turbo, because there may be times that you won't need or even won't want the calculator to run at the high speed. The high speed mode can use more power than normal speed, and with games, you might not be able to keep up with them. I have installed a switch in my 86.
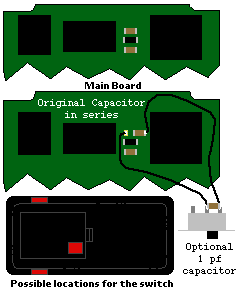
First, cut two four inch lengths of wire. Get a small slide switch that you can fit into the calculator and an optional 1pf capacitor. You will need to cut a hole for the slide switch. I used a Dremel tool to make the hole, but if you don't have one, you could probably make the hole with a soldering iron and trim it with a small knife. Keith L. Miller's instructions say that the inside of the battery case, beside the back up battery is the best place for the switch. It is a good place, but if you're like me, you will switch speeds a lot. I did NOT want to have to open the battery case each time I wanted to switch speed. You could cut a hole in the battery case over the switch, but I decided to place the switch along the side of the battery case on the angled part of the case (see the picture below the animation for recomended locations of the switch).
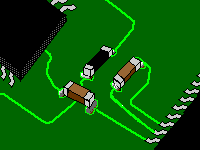
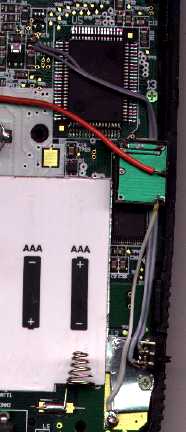
You will need to de-solder capacitor C13. This is one of the more dificult parts of the procedure. The best way is to put light pressure on the side with a small screw driver while heating one side of the capacitor, then the other, and continue back and forth until it comes loose. You don't want to over heat the capacitor. If you do burn it out or lose it (it is small), you should be able to get away with using a capacitor as large as a 33pf capacitor in its place. It'll run slower in slow mode though, and believe me, you can find a 22 pf cap in the radio shack pf assortment pack. Now, re-solder the bottom side of the 22pf capacitor to one pad where you just removed it. Solder the two wires to the switch. One of the ends of the two wires should be soldered to the other pad where the capacitor used to be, the other wire to the end of the capacitor. If you are using the 1pf capacitor, you only need to solder it between the two wires at the switch. Tape down the two wires, trying to cover as few components as possible. Cut a small notch on the edge of the silver shield to let the wire pass easily through. The illustration below will show all the details of the wiring in an easy to read diagram form...
Once the parts are installed you can reassemble the calculator by screwing in the screen, the silver shield, and then snapping and screwing the case back together. Turn on the calculator and adjust the contrast. Try running programs and do various things. You'll notice the difference! If you get garbled images, lines, or text on the screen, and you did not use a 1 pf capacitor, you may need to add one. If this occurs and you do have one, recheck your connections.
| LinkExchange Member | Free Home Pages at XOOM | Free Home Pages at GeoCities |

|
The Richfiles is copyright © 1996-2000. All Rights Reserved.
